Posts

Showing posts from 2013

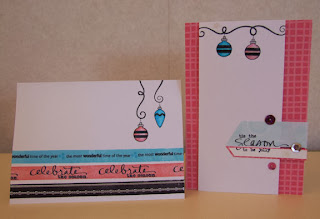
Last of my cards for Combat cards for the year.......

Image
My last crop night for the year I didn't feel like scrapping so I took along this pack of chipboard toppers that were free with the Australian Simply cards magazine a short time ago. I found some old papers in my stash that matched the colours, found a couple of card maps and had a play. I had a couple of sticker sheets for greetings as I forgot to take my stamps and I think they came out kind of cute.  Not likely to be blogging before Christmas so to all my friends and family have a lovely Christmas and New Year and make sure you take some time out to be creative in the New Year. Melissa

Day 5 and wrap up of the online card class.......

Image
Day 5 was a class about His and Hers holiday cards so I had a go with the designs by Kelly Rasmussen. Can you tell which is the feminine and which is the masculine?    The wrap up day had a faux letterpress technique by Jennifer MaGuire which I did like the look of and it took me ages to work out what I could use for it when I suddenly remembered a free die that I got with a magazine recently and used that. It is definitely a technique I need practice at because this is my second attempt  and I still have spots that I missed and places where I needed to scratch colour away. For a nice simple clean card it does work well though. The rest are just some extras that I did whilst playing with my stash at a crop last night. Stamps are from Whimsy stamps Christmas greetings and a Stampin' Up  single purchase stamp for this season. Last are left over stickers from a My Minds Eye - All is bright sticker sheet and some die-cuts. Thanks Josie for that lovely glittery snow

Day 4 extending the use of your stamps.........

Image
Just  a quick share using the same stamp set as I mentioned being the theme of Day 4 lessons. My take on Shari's and Kristina's cards using the Technique Tuesday - Good Cheer clear stamps by Ali Edwards.   There are not many picture stamps in this set so my play is limited but I'm sure there are lots of things I can come up with if I put my mind to it.  Now to venture on to day 5 lessons for a play...... Thanks for dropping by.....

Day 4.... with Shari

Image
I'm loving day 4 classes although I have not yet done the cards in the manner in which the lesson was intended. The lesson is about stretching your Christmas stamps and getting a few different designs from the same set of stamps.   I actually loved the colours and design of Shari's cards in the first part of the lesson so stuck with it and found an old Kaisercraft tree stamp. The greetings are from Technique Tuesday - Good Cheer by Ali Edwards and Paper Xtra - Christmas greetings.   I have definitely decided I am a stamp with the dye-ink first and then emboss over the top, kind of girl as I could just not bring myself to do it the other way around.    The rest of my shares today are designed by Ann Gerlach - my local Stampin' Up demonstrator   for her Stamp a Stack Christmas class that I went to on Tuesday afternoon. I did change up a couple (sorry Ann) when I got home but in the main stuck with the ones she had as the examples. Clearly I do not stamp stra

Last of day 3..........

Image
Just when I thought I was catching up nicely with the classes and keeping on top of the lessons, they throw in a couple of bonus weekend lessons..... Such great value these classes and so much fun to have a go at.   This top pair of cards are from Cristina Kowalczyk's idea of using stencils. More simple CAS cards that look very effective. I have used two different stencils from Crafter's workshop with some star sequins and bling on one with Kindyglitz on the other for the decorations. Stamped greetings are from Spellbinders - Heirloom ornament free stamps with a recent magazine and the Stamps of Life - lights4christmas set. The same three distress inks used on both cards - Peacock feathers, Peeled paint and Mustard seed.      This second pair of cards are from the teen crafters bonus ideas lesson. The card on the left inspired by Tanner Bell's design using the last of some scraps of Cloud 9 papers from several seasons ago.  The stamp on this is from Technique

Day 3 a simple CAS card......

Image
Another great idea by Shari Carroll was a CAS card that I have turned upside down really. It's a little different to the technique she was showing but I didn't have any stamps that would work with her technique so tried something a little different. I also do not own any long greeting stamps that would go across the card so instead found some old silver peel off stickers and painted them white with a paint pen and used that instead of a white embossed greeting. Stamp is from The Stamps of Life - holly4christmas set and I have coloured it using some frixion marker pens that I received as a gift from a Japanese exchange student. I really love the simplicity of this design but at the same time I am feeling like I need to add something to the bottom section of the card.  I will be good and resist the temptation though...... Happy Craftin'..........

Day 3 idea from Shari Carroll........

Image
 Shari has shared a great idea for using your die-cuts or punches for layering and this also makes a great card for using up all those scraps. It's a simple embossed background with stamped or patterned paper ribbon strips layered with a tag die-cut negative and punched circle with a stamped image and greeting on top. These are Kaisercraft papers from a freebie 6 x 6 pad that I received with a magazine recently. Stamp is from the Stamps of Life - Joy2christmas ? (I think) was the set. The die-cut sentiment is yet another from the Teresa Collins - December 25th Cricut cartridge which seems to be my go to cartridge for this years workshop. At least I am getting my monies worth from it. Thanks for stopping by..... Happy Craftin'...........

Day 3 simple quilling..........

Image
I don't feel I am quite cut out for quilling.... This was my effort which I did using a jewellery jig instead of the idea that Jennifer Rzasa had suggested. I think if I had done it the way that Jennifer suggested then maybe it may have been a lot stronger and tighter folded. Never mind, it ended up okay and it does make another good simple design for a card.  Stamp is from Technique Tuesday. Thanks for looking...... Happy Craftin'.............

Day 3 tag and Joy card..........

Image
Day 3 started with Laura Bassen showing a die piecing effect on a tag and a plaid stamping effect with a word on a line die.   This is my tag that I went and used on a card front and then I had no stamps that would work for the plaid stamping effect so I just went for the patterned paper design and created my own word on line die-cut in SCAL2 using Lauren script free font and a narrow rectangle.  I quite like the simplicity of this design and would consider this design again creating some different words. Thanks for dropping by..........

Day 2 with Jennifer and Laurie............

Image
Day 2 technique of inlaid die-cuts was my most challenging of the lessons so far more because of the fact that I was using my Cricut with the Cricut Craft room and Teresa Collins - December 25th cartridge and had to get my plan and the lining up of the layers spot on as I didn't need the weld option to work for this technique. This was my third cut effort to get the desired neat cut, the others had little fine lines of cutting around the stable where I was  a little off.  The second design was from Laurie Willison where she had used a metal die so I again set to work in CCR and used the postage stamp from Base camp with a basic rectangle to create the same effect. This centred flap actually lifts up to reveal the hidden greeting underneath. It's a lovely effect but I'm not sure I am into the hidden greeting, I think too many people would not really realise it is there. Off to start on day 3's lessons. Happy craftin'.........

Day 2 with Stephanie

Image
Stephanie Klauck had us inspired by cards using snowflake die-cuts and window fronts. I tried two of the ideas and the third is still sitting on my desk waiting to see if I find time to complete it.   Card to the left has an acetate window and the card on the right has suspended snowflakes that actually can spin around a little. If I was able to cut them nicely a  little smaller it would have worked better but I was using more of the snowflakes from the Cricut cartridge - Teresa Collins December 25th and I didn't want to go too much smaller because I didn't want them tearing as I lifted them off the mat and worked with them. These card bases have been sitting in my stash for several years now so it was a good opportunity to put them to good use. Happy craftin' all........

Day 2 ..... it's all in the die-cuts.

Image
The second class is all about die-cuts and using them on  your cards as they seem to be popular again with so many companies making metal dies and various electronic cutters on the market also.   This is my take on Debby's card using snowflakes cut on the Cricut with Teresa Collins December 25th cartridge. Gotta love Stampin' Up dazzling diamonds for a hint of glitter and a stamp from Whimsy stamps - Christmas sayings. I hand cut my hills as I had no dies for that job.    Loving the class so far. Thanks for dropping by.........

Day 1 ..... last card

Image
 As I mentioned in my last post I had completed the third card for the lesson and was waiting for some decent light to photograph it. So, based on Joy Taylor's class of using the negative and positive on your card, here is my result.    The front I have stamped the Kaisercraft music background stamp a couple of times and heat embossed with polysparkle ep. It's hard to capture in a photo but IRL it is quite sparkly. I liked her ombre effect on her card and decided to do similar but I note that it would be much better if you own a metal word die to do this as the Cricut cut has the potential to catch the edges of the different papers and make fine tears especially if using an intricate cut. This is the inside of the card using the positive image although I would be more likely to use it for the front of a card in future as I am not big on decorating the insides of my cards so much, I prefer to keep it to the outside where people see it more and leave the sentime

Day 1 still.....

Image
Day 1 classes have actually been about the inside of cards as well as the outside however I did not do the inside of Kristina's card yet as it was for a gift card so am not sure if I will use that part yet although I did love the idea of using a vellum pocket to hold it.   This is my edition of Jennifer McGuire's card. I stuck with her colour scheme as it appealed to me most. I do not own a christmassy background stamp so used an embossing folder as a stamp - Cuttlebug textile folder and just made my card not as tall as usual to allow for it to cover the entire panel. Stamps are from the Stamps of Life - Lights4christmas and trees4christmas and the die-cut tree is from Cricut cartridge - Teresa Collins December 25th.        My other share is using these gorgeous stamps that were free with the Australian Simply Cards magazine - Spellbinders Heirloom ornaments. I have stamped and embossed several of them ready to put on cards when I have time. My third card f

Holiday Card Workshop 2013......

Image
Online Card Classes - Holiday Card Workshop has started and I am playing along for the third time. It's nice to see the new latest and greatest products being put to good use and the different techniques that the industry experts use with them.  I really then enjoy the challenge of shopping from my stash to create a similar look.   My first card is based on Kristina Werner's initial card using an embossing folder yet leaving a smooth area for a greeting and then adding a little washi tape and colouring an image.  My next card is one I finished before the class using a free stamp set from a recent magazine that had an image of Holly Hobbie. One of my sisters really liked her and had a hanging on her wall for several years when I was just a wee girl so I remember the image oh so well. Thanks for dropping by and Happy Craftin'..............

10 Quick cards with the Cricut....

Image
Well, at least that was what the magazine suggested....Clearly Emily McQueen's idea of quick cards and my idea of quick cards are not on the same page. I saw this set of cards in Vol 17 no:8 of Australian Cardmaking, Stamping and papercraft and it inspired me to purchase the Gingerbread seasonal Cricut cartridge which then sat on my shelf unused until now. Maybe if I had the pack of Christmas chipboard words that she used along with enough letters in any of my white Thickers then it may have been several hours shorter however I have ended up with some nice bright cards and used up some old papers from my stash as well as reaquainting myself with the Cricut Craft room.   I changed up a couple of the designs and also found some different words to play with as "holly jolly" just doesn't cut it for me. A little different to my norm  but I am quite happy with the results. Happy craftin'..........

More Christmas cards.........

Image
I went in to Spotlight the other week and they had a set of Kaisercraft Twig & Berry postmarks stamps going out for $2. Being one for a bargain that I would actually use, I bought them and came home to have a play.   One of the ladies at a crop night I attended recently was making her Chrissy cards and she had pre-stamped a series of postcards using her friend's range of stamps. This inspired me to try something similar with the ones I had bought. I mixed in a couple of old stamps from a cheap set I bought at the $2 shop one time and also a recent greeting from the Stamps of Life set - Lights for Christmas. Used some really old paper that I have had and didn't like so found that by using the distress ink on it, it was enough to tone it down and I felt comfortable using for the background.  These cards were based around the ornament die-cut that I bought almost 2 years ago at a local card shop. Finally put them to use with some Technique Tuesday greetings and peel

Finally some chrissy cards for my own use...........

Image
After selling a batch of Christmas cards that I had made earlier in the year I decided to  get a start on my own use ones. I have this lovely My minds Eye -All is bright sticker sheet to use and started to play. More paper scraps and a freebie download printable music paper with a few die-cuts and a little ribbon and lace makes for a great start to my season.  Gotta love stickers that do all the work for you. Happy craftin'...........

Playing with stickers...........

Image
I  have really been trying to use up my stash whilst making card for Combat cards WA.   I came across this set of Rob and Bob studio 3D stickers and a paper tole magazine freebie that I had cut out already and not ever put together so my first two cards are made with those. Next I found a sheet of cat stickers that I liked but never used so made up a bunch of funky kids cards with them along with some bits and pieces of greetings cut from magazine freebies. Some Amy Tangerine papers from a 6 x 6 stack and heaps of scraps from old TLC (Top Line Creation) and Fiskars cloud 9 ranges with a few stamped greetings and grass thrown in for good measure.  Are you a cat or a dog person? Do you know of anyone who might like a card like these? Thanks for stopping by, have a great weekend............